Breaking a CAPTCHA in 15 Minutes
How to break a CAPTCHA using Python, OpenCV, Keras, and Tensorflow.
So, this took me a lot longer to get to than I was planning on 🤦🏼♂️ Despite my best intentions and greatest ambitions, life continues to happen and usually take priority over projects I'm doing on the side. The irony is that this project is relatively simple, both Adam Geitgey's original project/code and my implementation of it.
For this project, and others like it, I've decided the best way to learn (and present what I've learned) is to go through the code, mostly line by line and explain what is going on. There are definitely opportunities to modify/improve the original code, use different training data, and test out different neural network implementations, but in the interest of time I'm just going to leave everything as is.
The tools being used for this project are Python 3, OpenCV, Keras, Tensorflow. Pretty much your standard deep learning stack with OpenCV being used for image augmentation and manipulation. OpenCV was used extensively in the first term of the Udacity Self Driving Car Nanodegree.
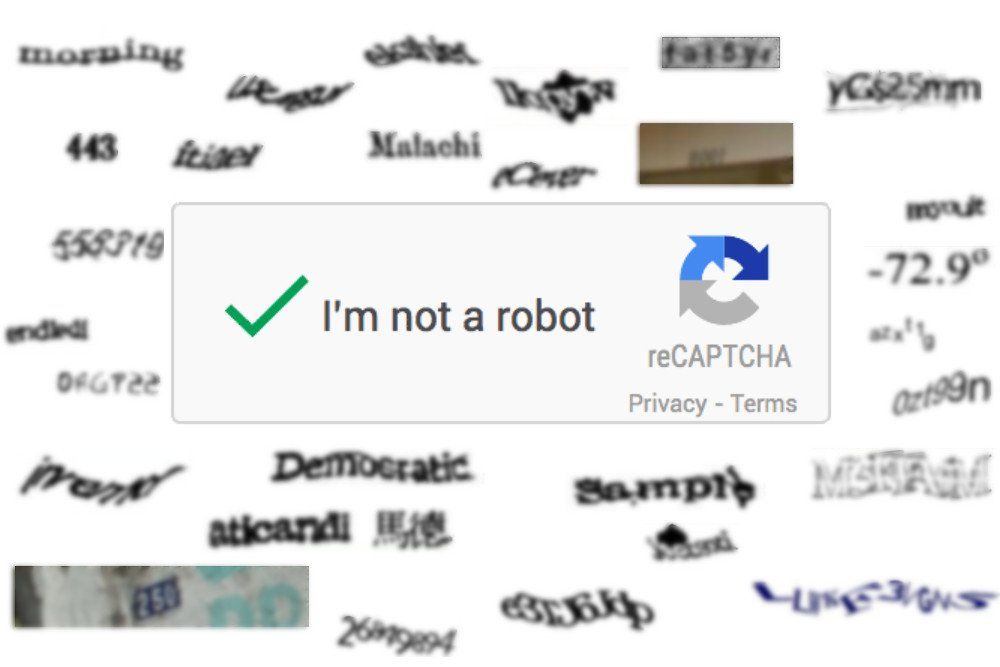
The CAPTCHA training data was "collected" by hacking around with the WordPress CAPTCHA plug-in and outputting the CAPTCHA images along with their correct filenames.
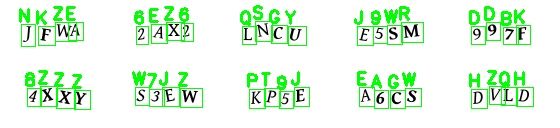
It's definitely possible to train a neural network on an image containing more than one letter/numeral, however, if it's possible to split them up the accuracy should increase and the training time decrease. This is exactly what was done with OpenCV in this project 👌🏼
The process for extracting the single letters, training the neural network, and using the model to solve CAPTCHAs is straightforward.
- Extract single letters from the CAPTCHA images.
python extract_single_letters_from_captchas.py
- Train the neural network to recognize single letters.
python train_model.py
- Use the model to solve the CAPTCHAs based on the trained model.
python solve_captchas_with_model.py
I'll go through each of these steps, explain the code and any problems that I encountered, and show the results.
⛏ Extract single letters for the CAPTCHA images
The first step in this process is leveraging the power of OpenCV to split the CAPTCHA images into separate letters and then augment the resulting letters for optimal learning. In order to process all of the images, we need a list of all of the images in CAPTCHA_IMAGE_FOLDER.
captcha_image_files = glob.glob(os.path.join(CAPTCHA_IMAGE_FOLDER, "*"))
glob finds all the pathnames that match a specified pattern while join joins together two or more pathname components. The * is equivalent to all files in the directory. So, putting that all together, glob is getting all of the pathnames inside of the CAPTCHA_IMAGE_FOLDER and saving them to the list captcha_image_files.
Next, we loop over all of the images and perform the image augmentation. enumerate() is used so that each of the image filenames is assigned an index. In this case, the index is only used to show the progress of the image processing.
for (i, captcha_image_file) in enumerate(captcha_image_files):
    print("[INFO] processing image {}/{}".format(i + 1, len(captcha_image_files)))

    filename = os.path.basename(captcha_image_file)
    captcha_correct_text = os.path.splitext(filename)[0]

    image = cv2.imread(captcha_image_file)
    gray = cv2.cvtColor(image, cv2.COLOR_BGR2GRAY)
    gray = cv2.copyMakeBorder(gray, 8, 8, 8, 8, cv2.BORDER_REPLICATE)
    thresh = cv2.threshold(gray, 0, 255, cv2.THRESH_BINARY_INV | cv2.THRESH_OTSU)[1]
Each image is loaded using cv2.imread() and converted into grayscale with cv2.cvtColor(image, cv2.COLOR_BGR2GRAY). An 8 pixel border is added around each letter using cv2.copyMakeBorder(gray, 8, 8, 8, 8, cv2.BORDER_REPLICATE) so that the image isn't constrained to the edges of the letters. cv2.BORDER_REPLICATE replicates the pixels on the edge of the image to create the border. There are several other options for creating a border in OpenCV as well. The final step before isolating the individual letters is thresholding the full image using cv2.threshold(gray, 0, 255, cv2.THRESH_BINARY_INV | cv2.THRESH_OTSU)[1]. Thresholding makes it easier to find the continuous regions that make up each letter.
contours = cv2.findContours(thresh.copy(), cv2.RETR_EXTERNAL, cv2.CHAIN_APPROX_SIMPLE)
contours = contours[0] if imutils.is_cv2() else contours[1]
Conveniently, OpenCV has a built-in function, findcontours(), that finds continuous regions of pixels of the same color. cv2.RETR_EXTERNAL is a flag used to only extract the outer contours of the region while cv2.CHAIN_APPROX_SIMPLE removes all redundant points and compresses the contour, saving memory.
for contour in contours:
    (x, y, w, h) = cv2.boundingRect(contour)

    if w / h > 1.25:
        half_width = int(w / 2)
        letter_image_regions.append((x, y, half_width, h))
        letter_image_regions.append((x + half_width, y, half_width, h))
    else:
        letter_image_regions.append((x, y, w, h))
The next snippet checks to make sure that the letters aren't conjoined. This happens some times in CAPTCHAs when the letters are very close to each other. Easy for a human to recognize, a little more complicated when you're using computer vision. To get around this problem, the height and width of the contour are examined and those that have a width to height ratio greater than 1.25 are split down the middle.
The detected letter images are then sorted using letter_image_regions = sorted(letter_image_regions, key=lambda x: x[0]). lambda effectively creates an inline function instead of a named function that returns the sorted first elements of the array.
def element_0(x):
    return x[0]

sorted(letter_image_regions, key=element_0)
The above is reduced to one line and reduces the code complexity.
Finally, each of the letters is saved as a single image. zip() returns a list of tuples, in this case the letter_image_regions and the captcha_correct_text. Each different letter is saved to its own folder so that they are easily accesible and organized.
for letter_bounding_box, letter_text in zip(letter_image_regions, captcha_correct_text):
        x, y, w, h = letter_bounding_box

        letter_image = gray[y - 2:y + h + 2, x - 2:x + w + 2]

        save_path = os.path.join(OUTPUT_FOLDER, letter_text)

        if not os.path.exists(save_path):
            os.makedirs(save_path)

        count = counts.get(letter_text, 1)
        p = os.path.join(save_path, "{}.png".format(str(count).zfill(6)))
        cv2.imwrite(p, letter_image)
🏋🏼 Train the neural network
Since recognizing letters and numbers is a relatively simple tasked compared to more complex images like dogs, cats, and roads; a complex neural network architecture isn't needed. A simple convolutional neural network with two convolutional layers and two fully connected layers is more than sufficient.
Before the network is trained a few things need to be done. The individual letter images are converted to grayscale, resized with consistent dimensions (20x20 in this case), and a third channel (color) needs to be added to avoid Keras errors. The label for each image is then created from the name of the folder that the image was located in. We end up with data and labels arrays that we will use for training.
for image_file in paths.list_images(LETTER_IMAGES_FOLDER):
    image = cv2.imread(image_file)
    image = cv2.cvtColor(image, cv2.COLOR_BGR2GRAY)
    image = resize_to_fit(image, 20, 20)
    image = np.expand_dims(image, axis=2)

    label = image_file.split(os.path.sep)[-2]

    data.append(image)
    labels.append(label)
The image data is then normalized so that the pixel intensity is between 0 and 1.
data = np.array(data, dtype="float") / 255.0
The sklearn function train_test_split is then used to create training and test sets. test_size refers to the proportion of the data that is used in the test split.
(X_train, X_test, Y_train, Y_test) = train_test_split(data, labels, test_size=0.25, random_state=0)
Since there are 32 different letters and numbers being classified standard one-hot encoding won't work. This is remedied using the sklearn function LabelBinarizer. It allows you to have one regressor or binary classifier per class (letter or number).
lb = LabelBinarizer().fit(Y_train)
Y_train = lb.transform(Y_train)
Y_test = lb.transform(Y_test)
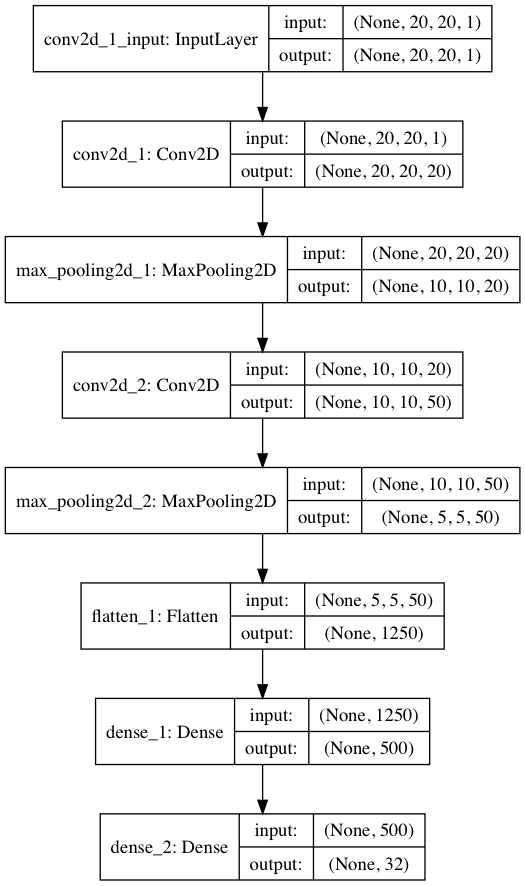
Using Keras the neural network only take a few lines of code to implement. A Sequential model in Keras is simply a linear stack of layers. In order, the first Conv2D layer consists of 20 filters, a 5x5 filter window, same padding (which means that output size is the same as the input size and requires the filter window to slip outside of the input, requiring padding), input shape of 20x20x1 (since the images are 20 pixels square and have one color channel), and use the relu activation (rectified linear unit). The MaxPooling2D layer uses the most common form which downsamples every depth slice in the input by 2 along both the width and height axes, discarding 75% of the activations. The second Conv2D layer uses the same parameters but increases the number of filters and the second MaxPooling2D layer is the same as the first pooling layer. The Flatten and Dense layers create a hidden layer with 500 nodes. The final Dense layer is the output with 32 nodes for each of the possible letters and numbers.
model = Sequential()
model.add(Conv2D(20, (5, 5), padding="same", input_shape=(20, 20, 1), activation="relu"))
model.add(MaxPooling2D(pool_size=(2, 2), strides=(2, 2)))
model.add(Conv2D(50, (5, 5), padding="same", activation="relu"))
model.add(MaxPooling2D(pool_size=(2, 2), strides=(2, 2)))
model.add(Flatten())
model.add(Dense(500, activation="relu"))
model.add(Dense(32, activation="softmax"))
Graphically, the neural network looks like this:
The model is compiled in a single line using Keras. There are many types of losses and optimizers but cross entropy and the Adam optimizer are two of the most commonly used.
model.compile(loss="categorical_crossentropy", optimizer="adam", metrics=["accuracy"])`
Finally, the model is trained on the training data and validated on the test data that was created earlier.
model.fit(X_train, Y_train, validation_data=(X_test, Y_test), batch_size=32, epochs=10, verbose=1)
After 10 epochs the accuracy is almost 100%, even after 1 epoch the accuracy is 99.5%. Given that this is a relatively simple classification task even higher accuracy is definitely achievable. Training on the command line looked like this:
Using TensorFlow backend.
Train on 29058 samples, validate on 9686 samples
Epoch 1/10
29058/29058 [==============================] - 41s 1ms/step - loss: 0.2413 - acc: 0.9413 - val_loss: 0.0226 - val_acc: 0.9950
Epoch 2/10
29058/29058 [==============================] - 44s 2ms/step - loss: 0.0160 - acc: 0.9963 - val_loss: 0.0140 - val_acc: 0.9968
Epoch 3/10
29058/29058 [==============================] - 46s 2ms/step - loss: 0.0062 - acc: 0.9983 - val_loss: 0.0081 - val_acc: 0.9977
Epoch 4/10
29058/29058 [==============================] - 40s 1ms/step - loss: 0.0052 - acc: 0.9986 - val_loss: 0.0054 - val_acc: 0.9988
Epoch 5/10
29058/29058 [==============================] - 38s 1ms/step - loss: 0.0022 - acc: 0.9993 - val_loss: 0.0115 - val_acc: 0.9975
Epoch 6/10
29058/29058 [==============================] - 37s 1ms/step - loss: 0.0069 - acc: 0.9985 - val_loss: 0.0076 - val_acc: 0.9979
Epoch 7/10
29058/29058 [==============================] - 39s 1ms/step - loss: 0.0026 - acc: 0.9994 - val_loss: 0.0129 - val_acc: 0.9971
Epoch 8/10
29058/29058 [==============================] - 38s 1ms/step - loss: 0.0050 - acc: 0.9984 - val_loss: 0.0177 - val_acc: 0.9947
Epoch 9/10
29058/29058 [==============================] - 41s 1ms/step - loss: 0.0011 - acc: 0.9997 - val_loss: 0.0047 - val_acc: 0.9991
Epoch 10/10
29058/29058 [==============================] - 42s 1ms/step - loss: 2.3045e-05 - acc: 1.0000 - val_loss: 0.0038 - val_acc: 0.9991
The elapsed training time is:  429.6541633605957
The total training time was 430 seconds or 7 minutes and 10 seconds.
🤓 Solve the CAPTCHAs
Now that the model is trained the last step is actually looking at the CAPTCHA images and classifying the letters. The trained model data is loaded and 10 random CAPTCHA files are chosen.
with open(MODEL_LABELS_FILENAME, "rb") as f:
    lb = pickle.load(f)

model = load_model(MODEL_FILENAME)

captcha_image_files = list(paths.list_images(CAPTCHA_IMAGE_FOLDER))
captcha_image_files = np.random.choice(captcha_image_files, size=(11,), replace=False)
model.predict() outputs a one-hot encoded prediction of what the letter or number should be classified as. The one-hot encoded output is then transformed back to a nornal letter using lb.inverse_transform(). inverse_transform() is a method of LabelBinarizer that allows you to transform binary labels back to multi-class labels.
prediction = model.predict(letter_image)

letter = lb.inverse_transform(prediction)[0]
predictions.append(letter)
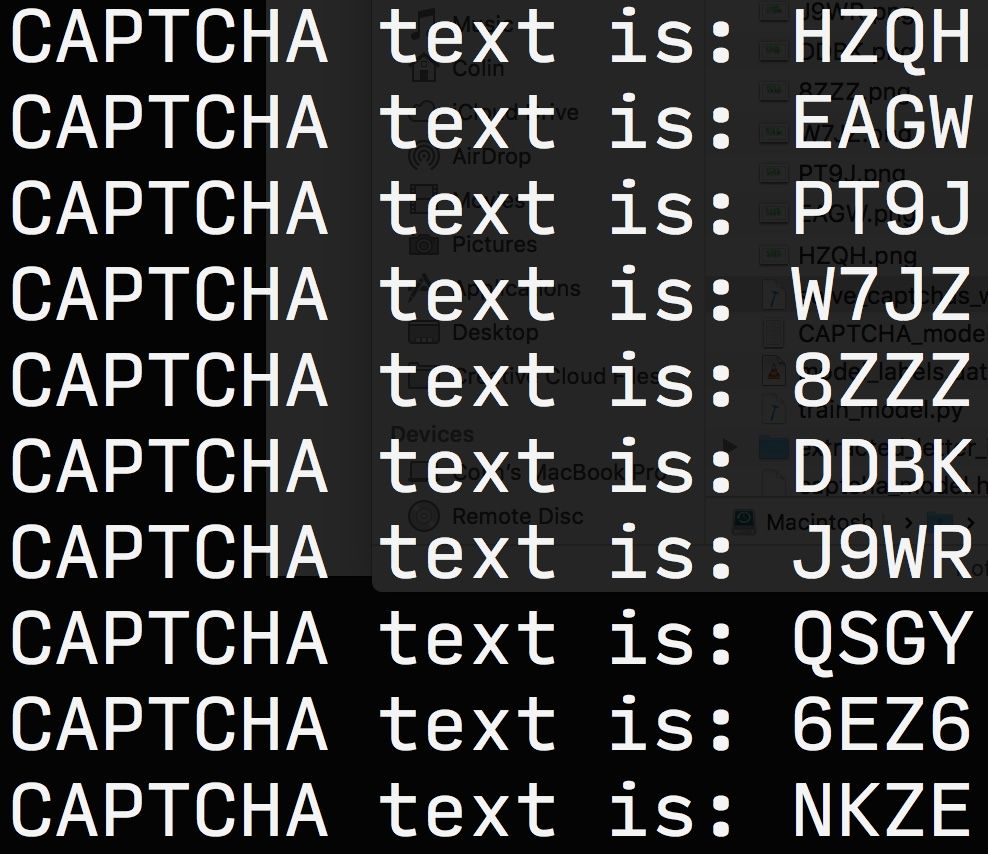
In addition to the prediction being output to the command line, the CAPTCHA image with the predicted letters/numbers is shown using cv2.imshow(). cv2.waitKey() either waits for a keystroke to advance to the next image or a specified amount of time (500-ms in this case).
cv2.imshow("Output", output)
cv2.waitKey(500) # Wait for a specified amount of time (in ms) before moving to the next image
The slightly modified code, resources, and notes for this project are located here. The original code and data can be downloaded here.